Sunday 11 June 2017

Getting your own 3D printer

As technology gets more mature, 3D printing technology has become more common and start to penetrate to consumer market. As a tech geek, I would definitely want to add 3D printer to my latest ‘toy’ collection.

Among the most established manufacturers, MakerBot might be the most well-known. They have sleek product and probably is the first company that introduces 3D printing to consumer market. But it come at a hefty price tag. Their entry level printer costs USD 999, excluding shipping cost. This is well beyond my budget.

In the end, I decided to buy from alternative manufacturer from China called Tronxy, through Chinese retailer Taobao, for only US$ 275, inclusive of shipping cost. You could find which model I bought here. Downside is, it is a DIY type of printer which you need to assembly yourselves. While fully assembled version is available at additional $40, I decided to assemble it myself. It was kind of fun actually and I really enjoyed assembling it.


For the price you’re paying, do not expect it to come with nice safety enclosure. But who needs a safety device when you know what to expect? I’ve put together in table below the comparison between my Tronxy with MakerBot Replicator Mini+. You can see that it is pretty much comparable to the Replicator Mini+. While some specification might be questionable, I feel it is really worth the money.

Model
Tronxy P802M
MakerBot Replicator Mini+
Machine weight
9.5 kg
9.3 kg
Material supported
ABS, PLA, TPU
PLA
Filament size
1.75 mm
1.75 mm
Build size
22 X 22 X 23 cm
10.1 X 12.6 X 12.6 cm
Printing speed
100 mm/s
?
Nozzle diameter
0.4 mm
0.4 mm
Layer thickness
0.1-0.5 mm
0.1-0.4 mm
Power consumption
45 W
?
XY axis accuracy
0.05 in*
0.8 mm
Z axis accuracy
0.05 in*
0.8 mm
Auto levelling
Yes
No (Build plate is factory levelled)
LCD screen
Yes
No
Heated bed
Yes
No
Camera
No
Yes
Operating Sound
?
58.8 dBA RMS
Software Bundle
N/A. Open source software to be used.
MakerBot Print Software, MakerBot Mobile
Price
US$ 275
US$ 999
* The unit is not specified but it appears to be in inch.

Sunday 24 January 2016

SolidWorks - Draft

The Draft function is used to create angle at certain face.This function is widely used on injection moulding parts. Parts fabricated by injection moulding parts would typically require certain draft angle to facilitate the removal of the parts from the mould.

Accessing the Function

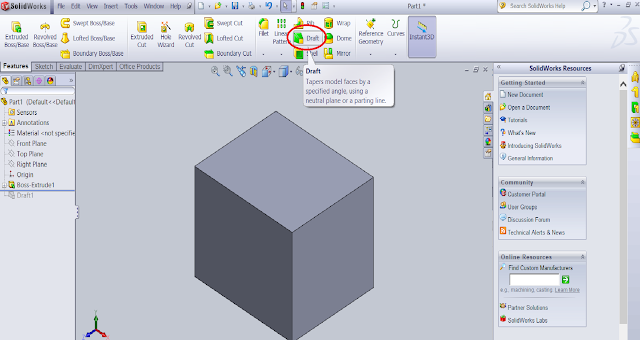
The easiest way to access the function is through the Features ribbon.

Alternatively, it could be accessed through Insert > Features > Draft.

SolidWorks draft feature
Accessing Draft feature


Draft Options


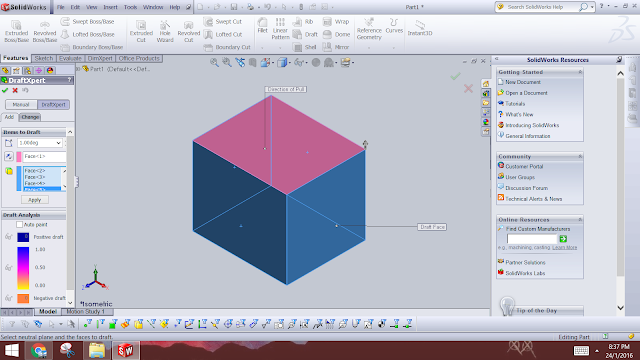
The Draft function is pretty straight forward as there is not many options to this feature. To create draft angle, first select the Normal Face (highlighted in pink on picture below). The Normal face is the surface perpendicular to the draft face. Next select the Surfaces to Draft (highlighted in blue on picture below).

SolidWorks draft feature
Setting up Draft feature
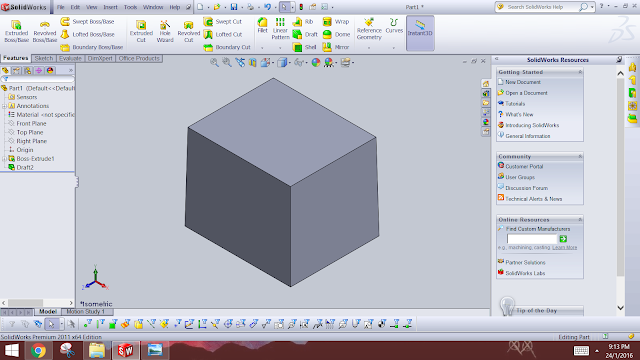
Results will be shown as below.
SolidWorks draft feature
After adding Draft angle
Note that during setting up the draft feature, there is small arrow pointing upward at the Normal face. This arrow indicates the 'pulling' direction, where the top face would become the smaller cross section area, and the lower face would become the bigger cross section area. Should this arrow is pointing downwards, the end result would looks like an inverted pyramid.

Friday 3 April 2015

SolidWorks Tutorial - A Beginner Guide to SolidWorks


Dear reader,

We are proud to announce that we are launching our first premium SolidWorks tutorial. This tutorial is based on our own series of Lego Tutorial, but with greater in depth explanation. Instead of modelling those little piece of Lego, you will be modelling a more complex shape as you see on the left.

This tutorial consists of 5 chapters, where in every chapters different SolidWorks features is being introduced. A step by step explanation, complete with the screenshot, will guide you how to use each functions. Extrude, Revolve, Sweep, Loft, Mirror, are just a few of the functions that you will learn.

Priced at just US$15, you will get this 69-pages eBook in pdf format. This tutorial is a perfect investment to improve your SolidWorks skill.

So, what are you waiting for? Click on the "Buy Now" button to make the purchase. Or you could take a look at some of the preview below.
                    

A Beginner Guide to SolidWorks
A Beginner Guide to SolidWorks - Preview


Friday 26 December 2014

Season Greeting & Important Announcement!


To all of our reader, we would like to wish all of you Merry Christmas and Happy New Year! Wish Santa bring you the gift of never ending happiness this Christmas!

On this Christmas season as well, we would like to announce that currently we are in the midst of preparing the first volume of our own SolidWorks tutorial. This tutorial will be a very useful guide for all of you who are new to SolidWorks and wanted to learn more about this software.

The tutorial will be based on our Lego Tutorial, with some modifications and update. Our initial Lego tutorial only teaches you the very basic function, which is Extrude Boss/Base and Assembly. The new tutorial would teach you how to use all SolidWorks basic functions, including Revolve, Loft, Sweep, as well as Pattern.

The tutorial tutorial would be released around mid of January 2015, so keep an eye on it! Please follow us to keep you updated!

Friday 21 November 2014

How to Make Money from CAD software?

Doing a 3D modelling could be a hobby for some people, like me. But some people might be wondering, how we could turn the hobby to opportunity to earn extra money?

Here is few example how we can capitalize your skill to earn side income:

1. Crowdsourcing Challenge on CAD community 

Right now, there are quite a number of CAD community out there for CAD user to meet another enthusiast.

GrabCAD for example, is one of the oldest online CAD community that exists on the internet world. Just like Facebook, GrabCAD allow user to share their CAD model, like other people models, contribute rendering of other people model, and even answer Q&A in the forum. 

Other companies could use these communities to crowdsoure for technology innovation or solution. One of the most famous example was when technology giant General Electric (GE) used this platform to crowdsource for their jet engine bracket design. The price for this challenge could reach up to US$8,000 if you take the first place home. That is quite a big amount of money for side income! 

There is quite a couple more platform for CAD crowdsourcing. Desall and CGTrader is another example to add few names to the list. Looking at the trend now, Crowdsourcing is getting more and more popular. So expect for some new name appear in the market.

2. Selling your CAD model

This might sound a bit crazy at first. Who wants to buy your CAD model? As crazy as it sounds, there is actually a community that allow you to sell your CAD model. 

CGTrader probably is the pioneer of this community. User could upload their CAD model and other people could download the model for a certain amount of money. This community continue to grow strong as the cost of 3D printing getting cheaper and cheaper. For example, a designer might be interested in designing iPhone cover. Other user found that the design is unique and is willing to pay certain money to get it printed.

3. Freelance job

If you are looking for something more mainstream, you could look for for freelance job. There is plenty of platform to search for freelance job. Odesk, freelancer, and Elance is just to name a view example. Getting one might be quite a challenge due to steep competition, so create your portfolio, and get ready for the interview!

Saturday 15 November 2014

Working with High Resolution Computer Screen

Alright, recently I bought a new tablet laptop, which is the Lenovo Yoga Pro 2. It is not necessarily the fastest computer for CAD software, but I was looking for portability. Everything in this computer works perfectly fine. The solid state memory will take only 3 seconds to start up the computer, and it is pretty light-weight and slim for a laptop.

The display is marvelous, displaying up to 3200 x 1800 resolution, any video would appear flawless. But despite that, it is causing few problems.

Few software seems to be incompatible with the resolution, displaying a very very small view. This problem was very well explained by Scott Hanselman here. According to the Lenovo forum, this root cause of this issue is that the software installed to the computer does not have resolution adaptive programmed to it. And this exception also happened to CAD software as well.

While the small icon is still visible (thanks to the high screen resolution), it is almost un-clickable. You will need like 3 seconds just to adjust the location of your mouse cursor in order to click the right things. After 30 minutes of modelling, trust me, you have achieved nothing. Well, maybe something, but not much.

SolidWorks in high resolution screen
Snapshot of SolidWorks in high resolution screen. Notice how small the icons are..

SolidWorks in high resolution screen
Another snapshot. Compare the sketch icon besides the Front Plane at model tree. Tell me how to click this icon?

Looking at the current trend, I don't foresee that any CAD software would update their programming as high resolution device is not that very common. Furthermore, typical CAD software user would rather to install their software on desktop rather than on portable laptop.

To handle with this issue, what I did was to set the screen resolution to 1600 X 900, and activate the "Let me choose one scaling level for all my displays", and then choose the 100% options. You will need to restart your computer in order for this changes to take place.

This option works like wonder not only for CAD software, but for other software that does not support resolution compatibility, for example Photoshop, AutoCAD, and Adobe After Effect. The high resolution is a little bit sacrificed with this option, and watching videos are not as pleasant as previously. And here's the million dollar question. Why would we're paying for device that can display good resolution when we're using only half of its capability? Its like buying a Lamborghini and use it only to buy groceries..

Solving Lenovo Yoga Pro 2 small icon issue
Set the screen resolution to 1600 x 900

Solving Lenovo Yoga Pro 2 small icon issue
And thick the "Let me choose one scaling level for all my displays"

Sunday 26 October 2014

Getting Your Own CAD Software

It is not a secret that CAD software license is expensive. I say expensive by means that unless you own a business that would benefit and earn profit by having CAD software, buying one for your own toy is not affordable.

For a quick glance, I listed few famous CAD software license price (price in USD).
 - SolidWorks: $12,000
 - Autodesk Inventor: $8,000
 - AutoCAD: $4,000
 - Unigraphics: $30,000
 - Pro/E Wildfire: $9,000
 - CATIA: $15,000

Note that the above price is just for approximate. In fact most of the time, CAD software does not come as fixed price, instead you need to ask for quotation form the company. They will ask what kind of package you require and they will give quote you their price. Typically it is enough to burn a hole on your pocket.

Getting Your Own Free CAD Software

Now here's the thing. What if you want to have your own CAD software without burning your wallet? Well, there is few steps that you can do.

1. Download a freeware

As more people get their access to computer, more and more freeware has been developed. CAD software is also part of it. Currently, there are quite a number of CAD software is available online for you to download. For free. Just to name a few, CadStd, Draft It, and Google Sketchup is probably the most free CAD software you can find online.

Typically the freeware do not have the ability to perform 3D modelling. Draft It for example, has interface very similar to those of AutoCAD, but only allow for 2D drafting.

Few points to note, though it is available for free, definitely the premium product would offer you more features, flexibility, and more robust model. Good software will come with a price. And to top all of that, the freeware typically does not support Computer Aided Manufacturing (CAM). So while some of it is able to do 3D modelling, it is just a model for your own viewing!

2. Autodesk student license

If you are still a student, good news! Because Autodesk is offering a student licensed software to students for free. You can download almost all software that Autodesk is offering using your student license. All you need to do is just register an account, verify your education institution, and you are all set. The only drawbacks  you have are (1) Your license will expire once you graduate, and (2) all the drawing you created will be watermarked "PRODUCED BY AN AUTODESK EDUCATIONAL PRODUCT".

3. Download from Chinese website. Nah, just kidding. We do not recommend you to do that.